


When I started writing CSS, my initial understanding revolved around using classes, IDs, types, and space selectors. I assumed that was the extent of it. However, over time, I learned more about new selectors, and in this article, I'm excited to share some of them with you.
CSS selectors are the tools we use to pinpoint and style HTML elements. While there's an array of CSS selectors to choose from, I'll focus on discussing just five that are particularly powerful and useful.
Direct Child Selector (> sign).
General Sibling Selector (~ sign).
Adjacent Sibling Selector (+ sign)
Link Pseudo-classes
Negation Pseudo-class (:not( y ) )
Direct Child Selector (> sign)
This selector targets elements that are direct children of a container div. It's most effective when you only want to select the immediate children of a parent element. Consider this example;
<div class="box">
  <p>This is the direct child</p>
  <div>
    <p>this is children of child div</p>
    <p>this is children of child div</p>
  </div>
  <p>This is the second direct child</p>
</div>

.box > p {
  color: red;
}
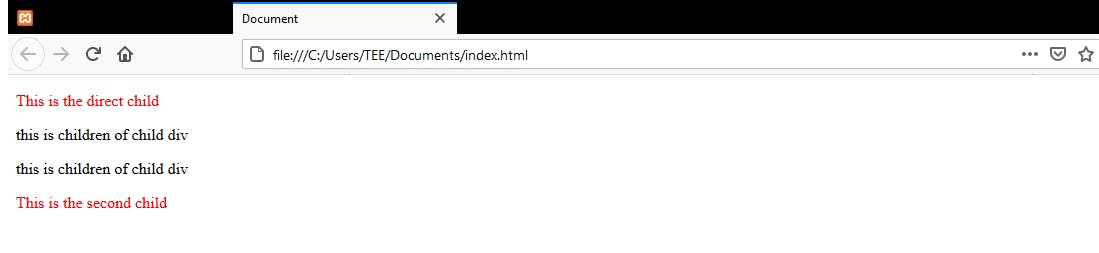
.box > p here targets only the <p> tags directly under the .box container div. The children of the child div don't turn red because they aren't direct descendants of the container div.
General Sibling Selector (~ sign)
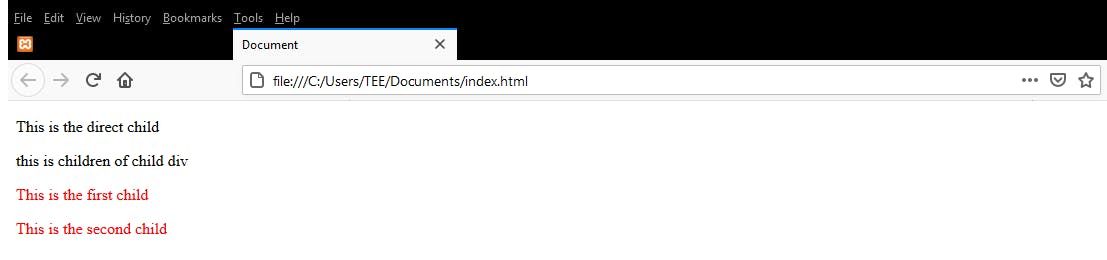
The ~ sign is a sibling combinator that targets all elements after the selected elements, it could be a div, type or just a class. Looking at the previous example; If you want to select all 'p' tags after the box-child div, we can do this;
<div class="box">
  <p>This is the direct child</p>
  <div class="box-child">
    <p>this is children of child div</p>
  </div>
  <p>This is the first child</p>
  <p>This is the second child</p>
</div>

.box-child ~ p {
  color: red;
}
And then, we get this result;
Another example we can also look at is this; If you have a list of items and you want to select only some items on the list, we can also use this ~ selector.
<div class="box">
<ul>
<li>Item 1</li>
<li class="list1">Item 2</li>
<li>Item 3</li>
<li>Item 4</li>
</ul>
</div>
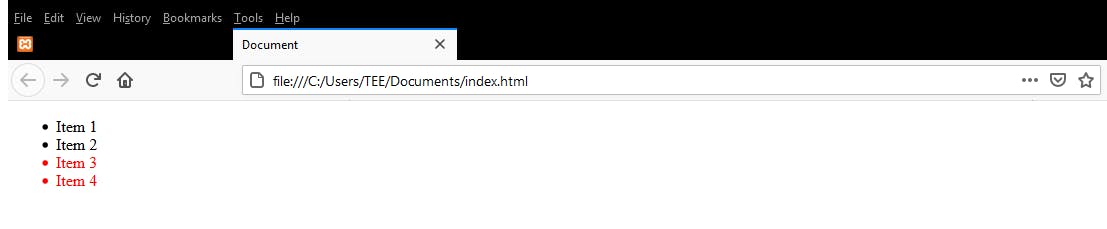
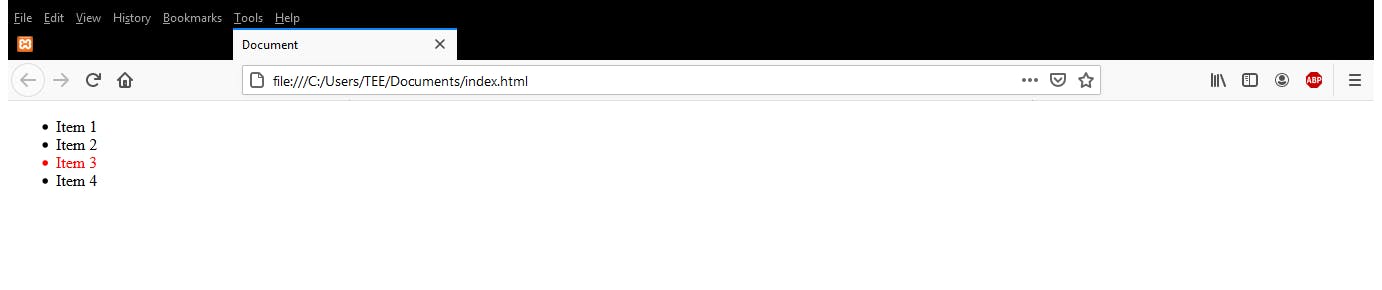
li.list1 ~ li {
color: red;
}
So, here, you’re saying I want all Li’s after the Li with the class of .list1 to have a red colour. The third and fourth item here changes to a red colour without including the first and second item.
Adjacent Sibling Selector (+ sign)
Similar to the general sibling selector, this selector combines elements that have the same parent div. It only selects the element directly succeeding the former selector. In this example, to select only the list item directly after the Li with the list1 class, you can use the +(plus) symbol.
<div class="box">
  <ul>
    <li>Item 1</li>
    <li class="list1">Item 2</li>
    <li>Item 3</li>
    <li>Item 4</li>
  </ul>
</div>

li.list1 + li {
  color: red;
}
And you should get this as a result;
Link Pseudo-classes
Using link pseudo-classes gives you the ability to style various states of your HTML link. These two pseudo-classes are worth noting:
:linktargets unvisited links.:visitedtarget links that have already been clicked.
Here is an example;
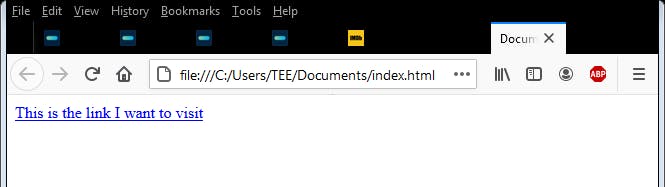
<div class="html-links">
<a href="#">This is the link I want to visit</a>
</div>
<style>
a:link{
color:blue;
}
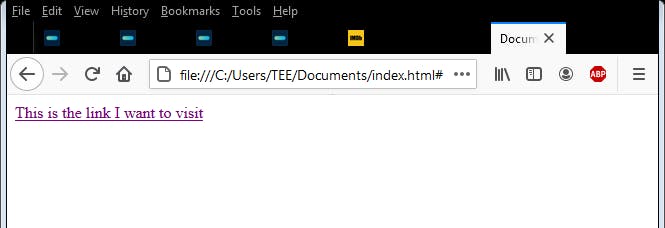
a:visited{
color: purple;
}
</style>
You have this when the link hasn’t been clicked;
This is when the link has been clicked.
Negation Pseudo-class (:not( y ) )
This selector is arguably the most powerful of all the selectors mentioned so far. The :not() pseudo-class enables you to select elements that don't match a specific selector.
For instance:
If you have a small div with a background image and a text overlay and you want to select the text displayed on this image and also style the div itself; Instead of using two different selectors to get this done(i.e. one to style the div and another one to negate it), you can use the :not( ) selector, which will in this context select every element except those that do not match the argument passed. Just like the one below;
.div:not(img) {
  background-color: Red;
}
This code implies "select everything within .div that isn't an image." It's an efficient way to style elements that deviate from a particular rule.
Another example we can look at is the one below;
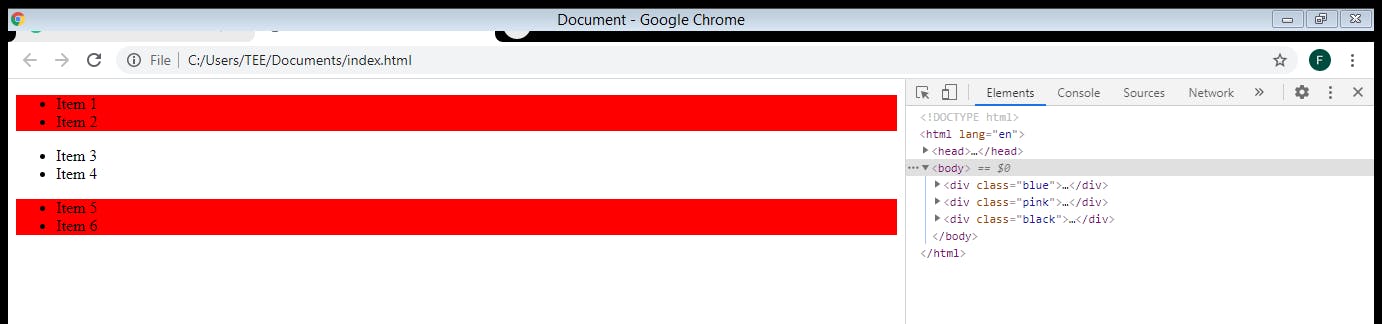
<div class="blue">
   <ul>
     <li>Item 1</li>
     <li>Item 2</li>
     </ul>
 </div>
 <div class="pink">
   <ul>
     <li>Item 3</li>
    <li>Item 4</li>
  </ul>
</div>
<div class="black">
  <ul>
    <li>Item 5</li>
    <li>Item 6</li>
  </ul>
</div>

 <style>
 div:not(.pink){
    background-color: red;
}
 </style>
Here we have two different divs with different classes and this code is saying, “Hey, I want to select all divs without the class of pink and I want them to all have a background of red. Which should give you this result;
Wrapping up
These CSS selectors are your tools for crafting finely tuned styles. Embrace their capabilities and improve your web development skills.
If you found this article helpful, don't hesitate to give it a like or share.
Thanks for reading.